Adjusting Tone
When printing black and white photos, you can produce the cooling effects of cool colors and the warming effects of warm colors.

|

|

|
|
Cool Tone is selected |
Black and White is selected |
Warm Tone is selected |
The procedure for adjusting tone is as follows:
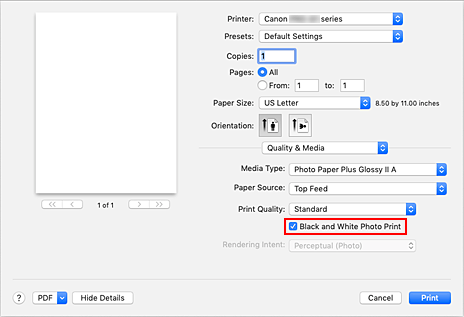
Select Quality & Media from the pop-up menu of the Print Dialog
Select the media type
For Media Type, select either Photo Paper Plus Glossy II A, Photo Paper Pro Platinum, Photo Paper Pro Luster, Photo Paper Plus Semi-gloss, Photo Paper Pro Crystal Grade, Lightweight Photo Paper, Heavyweight Photo Paper, Baryta Photo Paper, Premium Fine Art Smooth, Premium Fine Art Rough, Photo Paper Pro Premium Matte A, Heavyweight Fine Art Paper, Extra Heavyweight Fine Art Paper, Highest Density Fine Art Paper, Canvas, or Japanese Paper Washi.
Set black and white photo printing
Check the Black and White Photo Print check box.

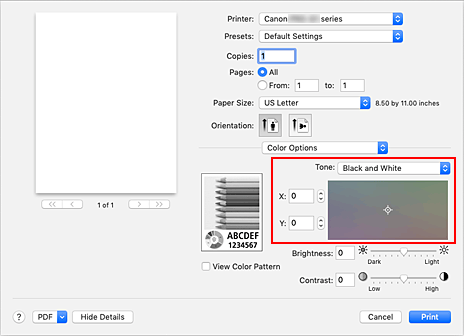
Select Color Options from the pop-up menu
Adjusting monochrome tones
Specify one of the following items from Tone. The selected value will be shown in the preview on the left side.

- Cool Tone
- This item adjusts color tones to cool shades (cool black). When you select Cool Tone, a value of -30 is entered for X, and a value of 0 for Y.
- Black and White
- This item adjusts color tones to neutral shades. When you select Black and White, a value of 0 is entered for X, and a value of 0 for Y.
- Warm Tone
- This item adjusts color tones to warm shades (warm black). When you select Warm Tone, a value of 30 is entered for X, and a value of 0 for Y.
- Custom
-
You can adjust the color tones while checking the colors in the adjustment area.
To adjust the color tones, either enter values directly or click the up/down arrows. When you enter values, set values in the range of -100 to 100 for X, and -50 to 50 for Y.
You can also adjust the color tones by clicking or dragging the adjustment area with the mouse.
If you select another color tone and then select Custom again, the values that were preset in Custom are restored.
 Important
- Tone and X, Y (Monochromatic adjustment value) are displayed when Black and White Photo Print check box is selected for Quality & Media.
If necessary, adjust monochromatic colors manually
To adjust the color tones, either enter values directly to X or Y (Monochromatic adjustment value) or click the up/down arrows.
You can also adjust the color tones by clicking or dragging the adjustment area with the mouse.Click Print
When you perform print, the color document is converted to grayscale data with adjusted tones. It allows you to print the color document in monochrome.
 Important
- If you select ColorSync for Color Matching, then Tone, X, and Y appear grayed out and are unavailable.

